In the last mini-training course lesson, we learned about the different methods of gathering the network traffic created during our Nmap scans. In this lesson, we’ll go through our trace file and see exactly what happens when Nmap hits the network.
An Overview of a Protocol Decode
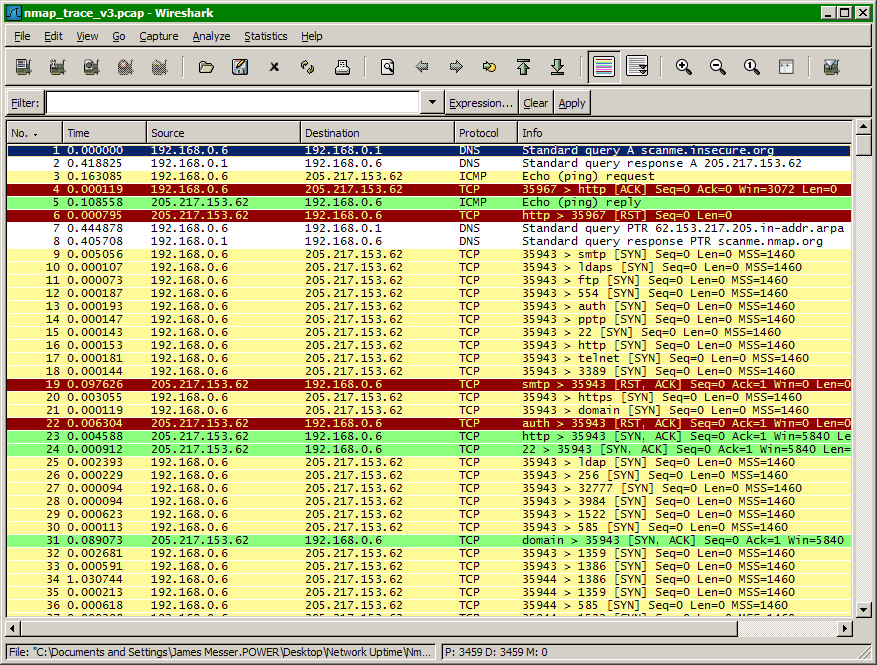
In this lesson, we’ll use Wireshark to provide a visual explanation of Nmap traffic information. In the Wireshark protocol decode screen, there are three display panes. The top pane describes a summary of each network packet, the middle pane shows details associated with the current selected frame, and the bottom pane displays a hexadecimal representation of the packet contents.
The Nmap Output
Before we examine the trace file, let’s review the information from our original Nmap scan:
C:\>nmap scanme.insecure.orgStarting Nmap 4.21ALPHA4 ( http://insecure.org ) at 2007-04-10 17:26 Eastern Daylight Time
Interesting ports on scanme.nmap.org (205.217.153.62):
Not shown: 1698 filtered ports
PORT STATE SERVICE
22/tcp open ssh
25/tcp closed smtp
53/tcp open domain
70/tcp closed gopher
80/tcp open http
113/tcp closed authNmap finished: 1 IP address (1 host up) scanned in 94.062 seconds
In our example, we scanned the host scanme.nmap.org with the default Nmap SYN scan. Three open ports were identified, three closed ports were found, and 1,698 ports were identified as filtered. In our trace file, we should be able to easily identify each of the open and closed port conversations and verify that the large number of filtered ports provided no response to Nmap’s probes.
The DNS Lookup
We began our trace by specifying the host scanme.nmap.org. Since our Nmap station doesn’t know the IP address of this device, the first thing that occurs is a normal DNS lookup for scanme.nmap.org.

The Nmap Ping
Before Nmap will begin scanning our newly-resolved IP address, it first needs to confirm that the remote device is active on the network. To complete this process, Nmap sends two frames to the target device to help determine the disposition. Frame 3 contains a traditional ICMP echo request and frame 4 is a not-so traditional out-of-order TCP ACK to port 80 of the remote device.

The Reverse DNS
Although we began this scan with a normal DNS query, Nmap also performs a reverse DNS to determine what the “real” name of the remote device might be. Often, the name used in the original query will be a different name configured in the remote DNS servers.

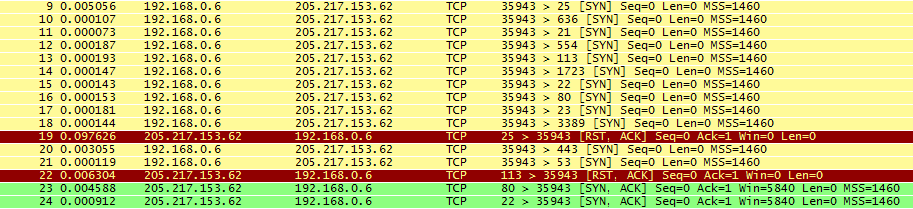
The SYN Scan
The rest of the trace file is associated with the actual Nmap TCP SYN scan. As we can see from this example, Nmap performs scans to devices in groups instead individually. This allows an efficient scanning process that does not overly tax the remote device.
Frames 9 through 18 begin the scan with a block of TCP SYN queries to random port numbers. Frame 19 is the first response from these probes, and the RST frame received in response confirms that port 25 is closed to all TCP traffic.
Do It Yourself
Every scan has different characteristics and traffic patterns. Some scans send thousands of frames, and others just send a few. To see what’s really happening, perform your own experiments with Wireshark and Nmap and you’ll be able to change the speed and tempo of your own Nmap scans!