A primary goal of network security professionals is to protect the network while maintaining maximum availability and performance of the network applications. These Nmap options will provide additional opportunities to optimize your security scans while keeping the network at peak efficiency.
Timing Options
Nmap is a very smart security scanner. When Nmap starts the ping and scan process, it monitors the response times from target devices very closely. If the target device is on a local network, the response times will be relatively fast and Nmap will quickly finish its work. If the target device is over a slower WAN link, Nmap will slow down to make sure it doesn’t miss anything that might occur to this far-away target device.
Nmap’s automatic timing will complete a scan as quickly as possible, but what if you want to override Nmap’s settings to go faster or slower? Fortunately, Nmap includes a –timing option that gives you complete control over the scan speed.
Nmap’s timing options range from 0 for Paranoid through 5 for Insane. At the Insane setting, the time between individual port probes is 5 milliseconds, and the Paranoid setting’s scanning delay is an incredibly slow 5 minutes! Here’s a summary of the timing settings:
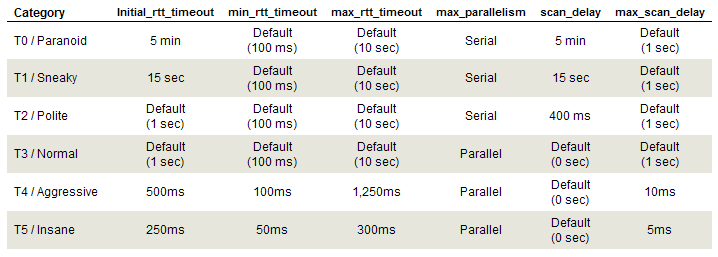
Nmap Timing Settings
Specifying Ports
During the default scan, Nmap will scan all ports between 1 and 1,024 along with the other ports listed in the nmap-services support file. This means that a scan with no additional command line options might scan thousands of port numbers!
This large number of ports is almost always a waste of time and bandwidth. To be more surgical with an Nmap scan, the -p option can be used on the command line to specify just the ports needed for probing during a scan.
For example, to scan only ports 23, 80, 143, and 8080 on a remote device, you can use this command:
#nmap 192.168.0.1 .p 23,80,143,8080
TCP ports can be specified by preceding the port numbers with T: and UDP ports are specified with the U: argument.
If all you’re looking to find are web servers or database servers, this single command line option can save you hours across an enterprise network!
Limiting Network Use
If you’ve ever run Nmap across a WAN link, then you know that it doesn’t take much to adversely affect the performance of these slower network connections. Although you can slow down the Nmap scan with the timing policy settings, there may be situations where you’d like Nmap to avoid traversing the WAN link entirely.
Nmap includes a useful option that allows you to set the time to live (TTL) value in the IP packet. The TTL value is normally used by IP routers to remove packets that may be looping through the network. By configuring the TTL to a low number, Nmap’s packets can be restricted to the most local IP subnets.
A TTL of zero will ensure that Nmap’s packets never leave the local IP subnet! This is an example Nmap command line that scans the entire range of IP addresses between 192.168.0.1 and 192.168.255.255, but the frames will be restricted to the local subnet and one network further out:
#nmap 192.168.*.* --ttl 1
Verbosity
The last Nmap optimization in this lesson doesn’t affect the performance of Nmap, but it does affect your ability to interpret the information that Nmap provides. Enabling Nmap’s verbosity options can provide you with information about the scan that would normally be unseen.
Nmap includes different levels of verbosity; none, level 1 and level 2. To enable verbosity, the command line option -v or -vv is used to set the level.
Here’s the output from a normal Nmap scan without any verbosity:
# nmap 192.168.0.1Starting Nmap 4.20 ( http://insecure.org ) at 2007-03-04 19:52 Eastern Standard Time
Interesting ports on 192.168.0.1:
Not shown: 1696 closed ports
PORT STATE SERVICE
80/tcp open http
MAC Address: 00:09:5B:D4:BB:FE (Netgear)
Nmap finished: 1 IP address (1 host up) scanned in 1.781 seconds
This is the same scan, but with the verbosity turned up to level 2:
# nmap 192.168.0.1 -vvStarting Nmap 4.20 ( http://insecure.org ) at 2007-03-04 19:52 Eastern Standard Time

Initiating ARP Ping Scan at 19:52

Scanning 192.168.0.1 [1 port]

Completed ARP Ping Scan at 19:52, 0.13s elapsed (1 total hosts)

Initiating Parallel DNS resolution of 1 host. at 19:52

Completed Parallel DNS resolution of 1 host. at 19:52, 1.36s elapsed

Initiating SYN Stealth Scan at 19:52

Scanning 192.168.0.1 [1697 ports]

Discovered open port 80/tcp on 192.168.0.1

Completed SYN Stealth Scan at 19:52, 1.00s elapsed (1697 total ports)

Host 192.168.0.1 appears to be up ... good.

Interesting ports on 192.168.0.1:

Not shown: 1696 closed ports

PORT   STATE SERVICE

80/tcp open  http

MAC Address: 00:09:5B:D4:BB:FE (Netgear)
Nmap finished: 1 IP address (1 host up) scanned in 2.719 seconds

Raw packets sent: 1698 (74.710KB) | Rcvd: 1699 (78.150KB)
As this output shows, the verbosity option can really make a difference. When version detection (-sV) or operating system fingerprinting (-O) is specified, the verbosity option can be even more dramatic!